Mountain hiking equipment
Hiking in the mountains is a wonderful activity that allows you to get away from it all, unwind, get some fresh air, and enjoy some interesting physical activity. Nature lovers can satisfy their curiosity, discover endemic plants and trees, and observe wild animals in their natural environment.
Many of you already enjoy mountain hiking, but many others want to take the plunge, escape the urban world to recharge your batteries, and reconnect with nature. We have therefore decided to offer you this useful guide to inform you about mountain hiking equipment and the main safety rules. These tips are based on our experience, both in France and in other countries. In fact, they correspond to our needs, our vision of comfort, and our preferences in terms of hiking equipment and clothing. We therefore advise you to try things out to find your own balance and build your own list of trekking equipment.
What you need to know before going hiking in the mountains
The first thing to know is that hiking in the mountains requires a certain amount of preparation and sufficient physical fitness. You cannot climb a mountain without being minimally prepared. The elevation changes can be challenging, and it is not always possible to stop in the middle of a hike.
Furthermore, the mountains have their own rules and dangers. Temperatures are generally lower, and rainfall is heavier. It is common for people to get lost in the mountains due toa lack of experience. The main advice is to carry a GPS device, at least on your mobile phone, so that you can find your way in all circumstances. You should also carry a battery (power bank) to power the GPS and avoid running out of power.
If you are hiking in the mountains in an area without mobile phone coverage, it is best to go with at least one other person. If you are alone, you must share your itinerary with a friend or family member. If there is a problem, they can give your itinerary to the emergency services. The idea is obviously not to scare you, but when it comes to hiking and trekking, you are safe as long as you understand the potential dangers.
The final safety measure is mountain hiking equipment. When hiking, you must always be prepared to face the elements and have equipment that protects you from the risk of injury or falls. This is what we will discuss in this article.
Finally, we have written an article for hikers who want to learn how to train properly before a trek. We invite you to read it and, if you have any questions, feel free to leave a comment 🙂

Essential mountain hiking equipment
In the mountains, you can’t mess around with equipment! Having the right mountain hiking gear means staying safe and getting the most out of the experience. It’s also essential to avoid calling out mountain rescue services for problems that could easily have been avoided. All of this comes at a human and financial cost.
Before talking about clothing and other accessories, let’s take a look at the essential equipment you need to go hiking in the mountains.
The hiking backpack
The most important piece of hiking equipment is the backpack, especially for treks lasting several days.
When hiking, your backpack is literally your mobile home. And a home must be practical to use, intuitive, and large enough to store all your belongings. It must also be comfortable, and we will emphasise this point.
To choose your backpack, you must first assess your needs. And your needs are assessed based on the length of the hike. For day hikes, a simple 40L backpack is sufficient. For hikes lasting between one and three days, you will need a 60-litre backpack to carry your sleeping bag and inflatable mattress. For hikes lasting between three days and a week, a 70-litre backpack is necessary to store more food and clothing. Finally, for treks lasting 10 days or more, a backpack larger than 85 litres is essential.
When it comes to budget, again, it depends on your needs. For hikes lasting less than three days, a cheap backpack, from Decathlon, for example, will do the trick. However, for long self-guided treks, it’s better to spend a little more and protect your back. We have been using the Osprey Aether Plus 85 backpack for several years for our self-guided treks. Not only is it practical and sturdy, but it also protects your back with its strong LightWire frame. It has a large number of well-positioned pockets for storing all your equipment, and all the compartments are accessible without having to take everything out. In short, we recommend it!
Finally, a backpack must be equipped with a rain cover to protect your equipment from the elements. This accessory is essential.

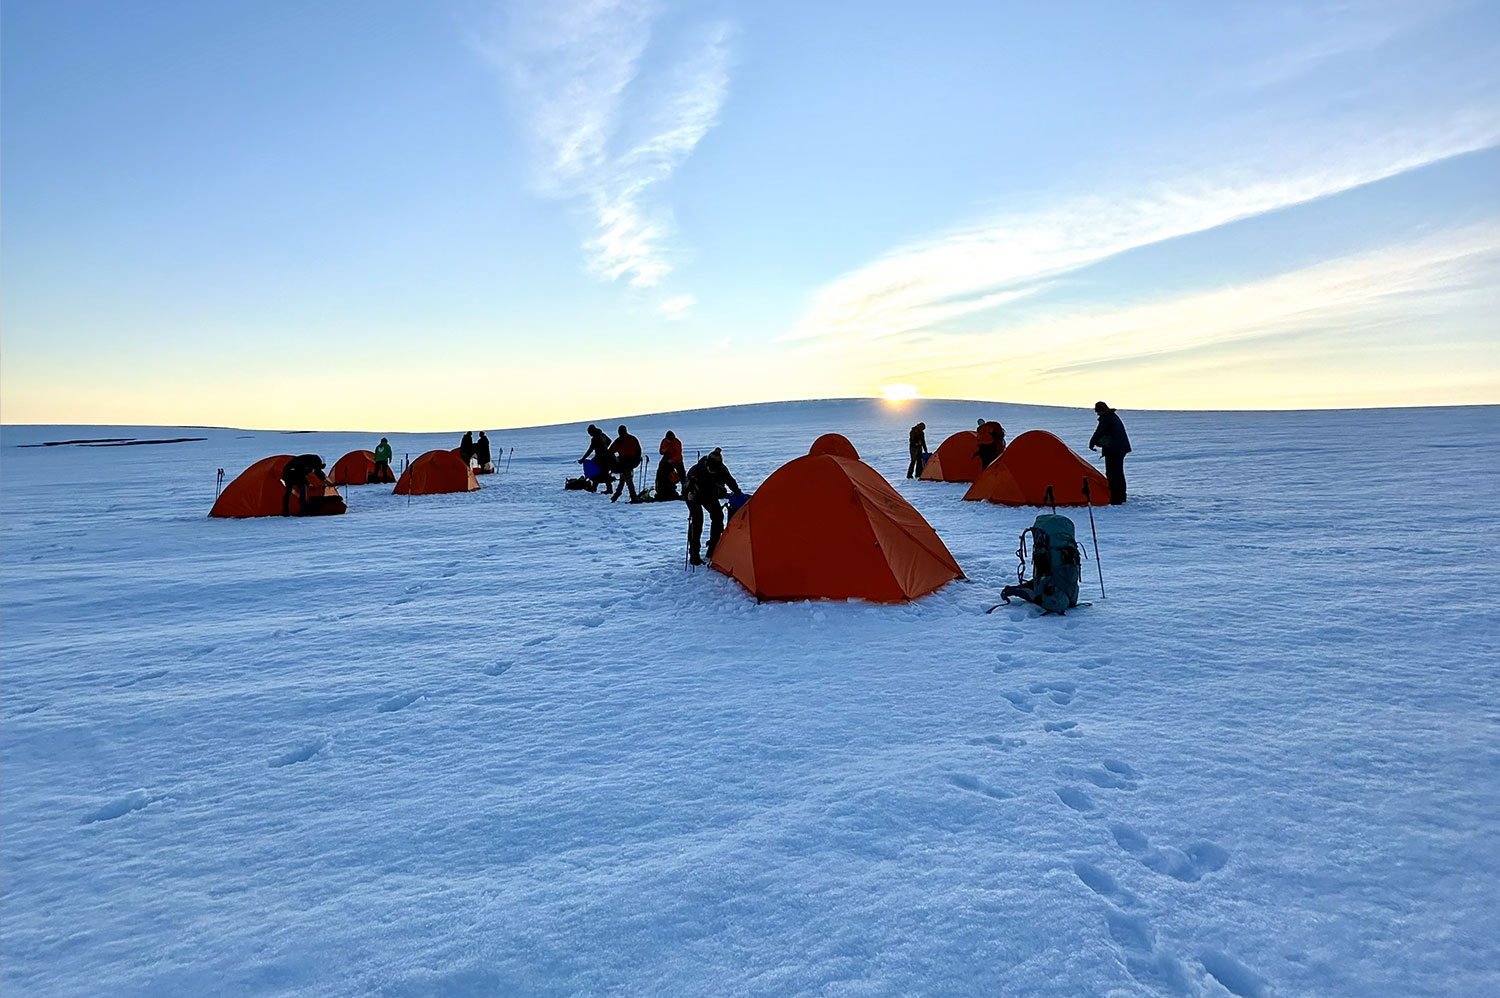
The tent
People who want to avoid staying in lodgings and shelters can opt for a tent. Trekking with a tent offers the luxury of independence and the ability to sleep wherever you want. You can improvise, change your mind, and sleep in spectacular places such as mountain peaks.
Choosing a tent is not a decision to be taken lightly. After all, it is a small house that you will be carrying on your back. It must be sturdy, reliable, and protect you from the elements.
It’s easy to get lost in the wide range of tents available on the market. But to help you see more clearly, we’ll keep it simple and talk about only two categories of tents:
- 3-season hiking tents: these tents can be used from spring to autumn, including in the mountains. They are reliable and generally withstand winds of less than 50 km/h.
- 4-season hiking tents: These tents are clearly designed for winter. They can withstand winds of over 80 km/h and are much stronger.
Another important criterion when buying a tent is weight. In general, the lighter and stronger they are, the more expensive they are. If you have the budget, MSR manufactures models such as the MSR Huba Huba and MSR Access. The former is an ultra-lightweight 3-season tent, while the latter is a 4-season tent weighing less than 2 kg. We highly recommend these tried and tested models.
Finally, for those on a tighter budget, certain Decathlon models, such as the MT900 Ultralight, are more affordable and do the job very well. However, we do not recommend using this type of tent in the mountains in winter.

The mattress
The criteria for choosing an inflatable hiking mattress are actually quite simple. For summer hiking, weight is the only thing that matters. In this case, Decathlon offers very lightweight and comfortable mattresses. For example, the MT500 weighs less than 500 g and is very comfortable.
For winter hiking mattresses, we recommend highly insulated models such as those from Thermarest. These mattresses come with an inflation bag that allows you to inflate them without using your mouth, which limits moisture inside the mattress. For your information, this moisture reduces the insulating power of the mattresses and can even freeze in winter.
It is advisable to try out different mattresses to find the one that best suits your body type and in which you feel comfortable. When hiking, it is important to sleep well to recover from repeated exertion.

The sleeping bag
The sleeping bag is undoubtedly the most important piece of hiking equipment! It is impossible to hike for several days if you are cold at night. You therefore need a sleeping bag that is suitable for the season and temperatures.
As a general rule, you should plan for a comfort temperature 10° lower than required. For example, if the forecast night-time temperature is 10°, then you should plan for a 0° comfort sleeping bag. This margin is due to the fact that fatigue and poor nutrition during a hike make us more vulnerable to the cold.
It is also important to note that there are down sleeping bags and synthetic sleeping bags. Personally, we recommend down sleeping bags for two reasons:
- They are generally lighter and less bulky (for example, the Valandre Lafayette weighs 1 kg and has a volume of 5.5 L for a comfort temperature of -5°C).
- At the same comfort temperature, they are actually warmer.
However, it is important to note that a wet sleeping bag loses all its insulating power. If you choose this option, remember to bring a waterproof compression bag to ensure that your sleeping bag stays dry.

Walking sticks
A few months ago, we wrote a short article to help you choose walking poles, which we invite you to read. We believe that walking poles are an essential piece of mountain hiking equipment. They allow you to save energy by transferring some of the effort from your legs to your arms, and they also make your steps more secure.
For example, we went hiking in the Hornstrandir Nature Reserve in Iceland, where walking poles proved to be indispensable. In the mountains, whether in Europe or America, it’s the same thing. Walking poles reduce the risk of falling, improve your balance, and reduce the risk of injuries such as sprains.
Hiking poles can even have useful functions, such as stretching out a rope to dry laundry or improving the anchoring of a tent. In short, as you can see, we strongly recommend using hiking poles when hiking or trekking in the mountains. And no, it’s not just for old people!

Summer mountain hiking equipment
Summer treks are completely different from winter treks. The equipment is not the same, the dangers are also different, and finally, as you might expect, the level of difficulty is much higher in winter.
Summer trekking is particularly recommended for people who have no experience. It allows you to learn to live self-sufficiently and gradually familiarise yourself with the challenges you may encounter during a trek.
Clothing
Going hiking in the mountains in summer has the advantage of allowing you to travel light. But that doesn’t mean you should neglect your preparation. It’s also important to remember that the weather in the mountains can be unpredictable, and sudden drops in temperature cannot be ruled out. So you should always have a plan B. Here is an example of a list of clothing for a summer hike:
- A few synthetic hiking T-shirts.
- A down jacket in case the temperature drops.
- A thin windproof and waterproof jacket to protect you from the wind and bad weather.
- Summer hiking trousers that wick away sweat and can be converted into shorts.
- Double-layer synthetic hiking socks to reduce friction (and therefore blisters). Decathlon’s Hike 520 socks work very well.
- Above 1,500 metres altitude, you should also bring a hat, a neck warmer, and fleece gloves.
All clothing must be made of synthetic material or merino wool to limit unpleasant odours. Avoid cotton clothing, which retains perspiration and takes a long time to dry.
Finally, for a trek lasting several days, there is no need to take more clothing, except for a trek in a region where there is no water. Otherwise, simply wash your T-shirts and underwear every two to three days.

Hiking boots in summer
As with clothing and equipment, the choice of footwear differs between summer and winter. In summer, the main criteria for choosing summer hiking boots are moisture-wicking and safety.
Let’s talk about safety first. Good mountain walking shoes are shoes that support the ankles to limit the risk of sprains on the one hand, and shoes that allow you to walk on uneven terrain on the other. They must therefore be high-top and have a sole that is thick and rigid enough to absorb shocks.
Ideally, you should use category B or BC shoes for safety reasons. However, these shoes are not really designed for hiking in summer. If it is really hot, then I recommend models designed for the desert, such as the Meindl Sahara or the Lowa Zephyr Desert. These shoes are designed to wick away perspiration while providing minimal protection for the feet, as desert hikes are often on rocky terrain.
If, on the other hand, the temperatures are mild, then it is better to opt for category B trekking shoes.
Finally, even though it is common practice, we do not recommend using trainers or running shoes. While these models are undoubtedly the most comfortable and lightweight, they offer absolutely no protection for the feet and ankles.

Summer hiking accessories
Last November, we had the opportunity to go trekking in the Tassili n’Ajjer in Algeria. At that time of year, temperatures were still high during the day, and the air was very dry. We are also used to hiking in Europe during the summer. These combined experiences allow us to offer you feedback on summer mountain hiking accessories, taking into account both dry and wet regions.
Here is a non-exhaustive list of our summer trekking accessories:
- A headlamp for night-time navigation.
- An insulated water bottle to keep water cool.
- A stove and hiking cooking utensils.
- A hat or cap to protect your head and face from the sun’s rays.
- A hiking solar panel to recharge your devices (we recommend the Bigblue 28 watts, which we have tested on long treks).
- Sunglasses.
- Sunscreen and a small pot of baseline to rehydrate your mucous membranes.
- If ticks are present in the area where you are hiking, then you will need: A tick remover and disinfectant.
- Mosquito repellent if there are a lot of mosquitoes in the area.
- A first aid kit to treat blisters and minor injuries.
- A piece of string to dry clothes or make repairs (it can be used to repair walking sticks, for example).
- A pocket knife is always useful.
- A handkerchief or cloth (which can also be used to stop bleeding).
Finally, Lilla offers a comprehensive guide to hygiene while hiking on the blog. Feel free to check it out before finalising your list of hygiene products. You’ll find everything you need to know about toiletries.

Winter mountain hiking equipment
In winter, trekking equipment is not something to be taken lightly. The consequences of being poorly prepared or inadequately equipped for a trek can be dramatic. Unlike summer, winter in the mountains presents a number of dangers that you need to be aware of and anticipate. Those with no experience can seek the help of one of the many mountain guides whose job it is to train beginners.
It is not advisable to go on a multi-day mountain trip for your first experience. The ideal approach is to start with day hikes, then overnight hikes, before tackling long, multi-day treks on your own.
Clothing
For winter hiking, follow the “onion layer” rule when choosing your clothing. In other words, wear thin layers that you can add or remove depending on the temperature and how much physical effort you are exerting. One of our most extreme experiences was hiking in Iceland in winter. And this technique proved to be very effective!
Here is an example of clothing for a winter mountain hike:
- A thermal base layer consisting of a merino wool undershirt and merino wool or silk leggings.
- Winter hiking trousers. We recommend one of Fjällräven’s winter trousers, renowned for their quality and durability.
- A thin fleece for periods of intense physical activity.
- A thicker fleece for periods of low physical activity.
- A warm hooded jacket for rest periods.
- A waterproof windbreaker to cope with bad weather while walking. To be worn with the warm jacket in cold and wet conditions.
- A warm hat to protect your head.
- Warm, waterproof gloves for inclement weather.
- Silk gloves to wear if the weather is fine and cold while walking.
- Several pairs of merino wool hiking socks (it is important to bring spare pairs in case of water ingress).
- A fleece or merino wool neck warmer to protect your neck.
When hiking in the mountains in winter, you need to be very careful. Ideally, you should prepare a list of hiking clothes several weeks in advance and make sure you have everything you need. Forgetting even the smallest item could mean having to abandon the trek, as every item is essential.

Winter hiking boots
In winter, you don’t go to the mountains with just summer hiking boots. Winter mountain hiking equipment must be adapted to the temperatures, snow, and level of difficulty.
Hiking in winter means making sure your feet stay warm and dry, and having a pair of winter hiking boots that are sturdy enough to cope with an environment of rock and ice. To do this, you need to choose the right category of footwear. While category B hiking boots are sufficient in summer, in winter it is better to opt for category BC boots. These boots are designed for both trekking and mountaineering. They have stiffer soles to cope with rough terrain, better ankle support to prevent sprains, and better waterproofing.
In addition, to improve the waterproofing of your footwear during a winter mountain trek, we recommend using wax. The technique consists of spreading wax on your footwear and then using a hairdryer to melt the wax. This allows the waterproofing agent to flow into inaccessible areas such as seams, ensuring perfect waterproofing.
Finally, having tested them for several years on self-guided treks, we recommend Meindl Island shoes. These BC category shoes are sturdy, comfortable, waterproof, and durable. Meindl even offers a repair service (sole replacement, etc.) to make them last even longer.

Winter hiking accessories
Some accessories are essential for ensuring safety when hiking in the mountains in winter. Depending on the terrain, some accessories may be unnecessary or, conversely, mandatory. For example, a pack containing an avalanche transceiver, a probe, and a snow shovel is essential when hiking in the Alps, where there is a high risk of avalanches. However, it is unnecessary in low or medium-altitude mountains where there is no such risk. We will focus on this aspect of winter hiking and leave aside hikes reserved for experts.
Here is a non-exhaustive list of accessories for winter mountain hiking:
- A headlamp to find your way around the camp at night. It is also a safety accessory if you are caught out by nightfall.
- An insulating mat: this allows you to rest in any situation without risking getting your hiking trousers wet.
- A pair of gaiters: these protect your shoes from snow and keep your ankles warmer.
- A pair of snowshoes: to make it easier to walk on snow, a pair of snowshoes is essential. Otherwise, the physical effort required would be excessive.
- A thermos flask: to keep your drinks warm for longer and enjoy a coffee or tea outside of mealtimes.
- A stove, a gas bottle, and a cooking set: in other words, all the equipment you need to boil water and prepare food.
- A lighter and a firelighter made of 80% resin. This allows you to light a fire in any conditions. It is also wise to bring a second lighter, in case the first one fails.
- A hiking snow shovel to prepare the tent site.
- A first aid kit to treat blisters and minor injuries.
Accommodation options in the mountains
Depending on the level of comfort you want, there are several types of accommodation available when hiking in the mountains. First, there is the option of permanent accommodation, such as a hotel or lodge. This type of accommodation allows you to rest, showe,r and eat at each stage of your journey. The level of comfort is therefore high. However, it is not always possible to find lodges along a hiking route. This makes the trek less flexible and forces you to pass through villages.
The second accommodation option during a mountain trek is a refuge. There are thousands of mountain refuges. Some are manned, others are not. Some charge a fee, others are free. These refuges allow you to spend the night in a dry and warm place, and to do without a tent (and therefore travel lighter). But as with hostels, this option is restrictive. You have to choose a route that passes by a refuge every 24 hours.
Finally, the third accommodation option is a tent. It offers basic accommodation but great flexibility in choosing your route and the security of being able to sleep no matter what happens (for example, if you get stuck between two stages). However, choosing a tent for a mountain trek requires some knowledge and a little experience. In the long run, it is also the cheapest option, at least for regular hikers.
